I. Trik 1
At some cases, tutorial reset ink level HP cartridges in this blog sometime fail to. Which is is possible to be caused by the condition of every printer differ. to reset ink level cartridges HP 21, HP 27, HP 56, HP 58, HP 22, HP 28 and HP28, you can use following methode.
- Turn your computer OFF and then remove cartridge from printer.
- Turn printer off
- Place a piece of tape over the top left contact as shown in BLUE on the picture to the right.
- Turn on printer. Printer will automatically print test page. (if printer does not print a test page but goes through a priming routine continue following steps when routine ends.
- Remove cartridge from printer.
- Place a piece of tape over top right contact as shown in RED on the picture to the right.
- Return cartridge to printer. Printer will go through a series of tests. Which will be quite audible.
- Remove cartridge from printer.
- Place a piece of tape over the two contacts on the right side of the cartridge as shown in GREEN on the picture to the right.
- Return cartridge to printer. Printer will run additional tests and be quite audible.(If you check your ink levels at this point you will receive a “printer busy message”)
- Remove cartridge from printer and remove all tape from cartridge.
- Reinstall cartridge. (If you check your ink levels at this point you will receive a “printer busy message”)
- Turn printer off. Wait for 20 seconds and turn the printer back on. Ink level should now read full.
II. Trik2.
This reset methods be used to reset ink levels on HP printer that using cartridges HP21, HP27, HP56 and HP58 (On most models). I have tested this reset methods on HP Deskjet 2466 and work perfectly but in other HP printer types this reset methods does not work.
To do this reset methods no software resetter required, just require only a piece of tape. If this reset method does not work on your printer you will need to repeat this process. If you have to reattempt the reset turn your computer off before doing so. Leave computer off during the reset process or disconnected the printer from computer.
Here the Ink levels reset methode for HP cartridges HP21, hp27, hp56 and HP58:
- Remove cartridge from your printer.

- Place a piece of tape over the top left contact as shown in red on the picture to the right.
- With the tape covering the contact place cartridge back into printer.
- The printer will perform and alignment page. (Some newer models no longer print alignment pages. If printer runs through a series of priming routines and stops for 20 seconds continue through with next step.)
- Once an alignment page has been printed remove cartridge from printer.
- Place a piece of tape over the second contact shown in red.
- Place cartridge into printer with both pieces of tape. (One covering the first contact and one cover the second contact.)
- Printer will print another alignment page. (Some newer models no longer print alignment pages. If printer runs through a series of priming routines and stops for 20 seconds continue through with next step.)
- Once the second alignment page has been printed remove cartridge from printer.
- Remove tape pieces from cartridge contacts Make sure there is no residual adhesive on cartridge contacts.
- Place cartridge into printer. Cartridge should now read full.
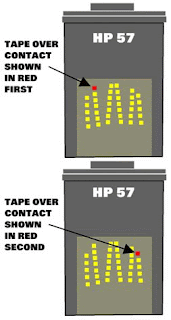
Ink level Reset method for HP Cartridges HP22, HP28 and HP57 almost similar with Ink Levels Reset for HP Cartridges HP21, HP27, HP56 and HP58. HP22, HP28 and HP57 is color cartridges HP printers. This manual reset methode to solve low ink warning on this hp cartridges. This ink levels reset method has tested and also work on my HP printer HP D2466. If this ink levels reset methode does not work on your HP printer, you can try more than 1 times in your hp printer. Here Ink levels reset methode for HP Cartridges HP22, HP28 and HP57 (On most models)

- Remove cartridge from your printer.
- Place a piece of tape over the top left contact as shown in red on the picture to the right.
- With the tape covering the contact place cartridge back into printer.
- The printer will perform and alignment page. (Some newer models no longer print alignment pages. If printer runs through a series of priming routines and stops for 20 seconds continue through with next step)
- Once an alignment page has been printed remove cartridge from printer.
- Place a piece of tape over the second contact shown in red.
- Place cartridge into printer with both pieces of tape. (One covering the first contact and one cover the second contact.)
- Printer will print another alignment page. (Some newer models no longer print alignment pages. If printer runs through a series of priming routines and stops for 20 seconds continue through with next step.)
- Once the second alignment page has been printed remove cartridge from printer.
- Remove tape pieces from cartridge contacts
Make sure there is no residual adhesive on cartridge contacts. - Place cartridge into printer. Cartridge should now read full.


0 comments:
Posting Komentar